Virginia Beach Beauty Life + Style Blog | SWEETHAUTE swthaute: DIY Home Project
*Posts may contain affiliate links, proceeds generated from those links support this blog. Policy/Disclosure  
Showing posts with label DIY Home Project. Show all posts

Monday

DIY Lace Pumpkin Halloween Decor

 DIY Lace Pumpkin Halloween + Fall Decor

This idea is super fast, cheap, easy to put together for your next Halloween Fall Decor project! DIY Lace Pumpkins Halloween + Fall Decor budget friendly and gorgeous. Just think...it would look so good on the porch, table, or mantle. 

These pumpkins are SO So so fantastic and wonderful, they are unique and fun... they look so good with my current fall and halloween decorations. 


Supplies:

Pumpkins {various sizes}
Ribbon
  -Orange


Instructions:

Step 1:

Use the 'body' section of the stocking for larger pumpkins. Then for smaller/ tiny pumpkins use the sock sections that are tube shape.


Step 2:

Gather the top of stockings fabric and knot it or you tie it with bakers twine/ ribbon.

~Be Sweet
Christina
Sweetest Haute 


SUBSCRIBE | and follow @SWEET HAUTE 
Instagram | TikTok @sweethaute | YouTube | Pinterest, Twitter.


Sunday

DIY String Light Post Planters

DIY String Light Post Planter

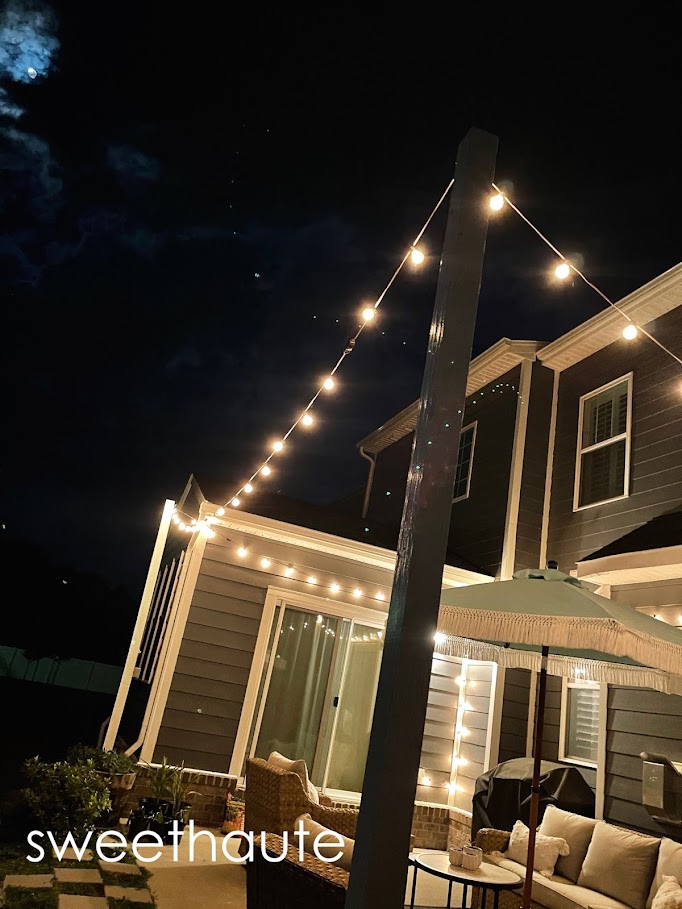
How to make easy temporary DIY String Light Pole / Post Planters for your outdoor living space! Welcome to SWEETHAUTE, I'm sharing with you our new patio's DIY String Light Pole/ Post Planters that we made with amazing Jim Beam Whiskey Wine Barrels. Believe it or not...these wine barrels actually smelled amazingly earthy; just like the strong, rich, aged whiskey spirits which were stored in these beauties. These outdoor DIY string light pole planters can be done in 1 weekend or 1 day. They were easy to put together yet they make a huge impact on an outdoor living space!

DIY String Lights Pole Planters

We actually were working with a concrete slab that was already in place at our new house. The home that we are currently living in came with an outdoor patio cement slab that is adjacent to a main living area of my house that 'NEEDS' all the natural light it can get. I didn't build this house or else I would've added a few more windows, transoms, french doors etc, moved some elements around. This was an inventory home on a great side of town with amazing schools so we jumped on it when we saw the price point square footage ratio. We got an incredible deal but there are many things we'd like to change to make it fit our needs and make it our home. I didn't want to add a patio cover or a pergola because of the natural light factor. I need as much light as I can get there.

I also really, really wanted string lights in my back patio area for gatherings, and ambiance during parties + bbqs. I like this option because it's temporary, not attached to the house, and no digging {permits} or calling utility company to mark required. Fast because no building permits for a patio cover or attached pergola. I already had landscape lights back there and the patio came with 1 backdoor porch light but that was it for lighting. We had a shed, grill, and trampoline out there that we wanted to make more user friendly and change the vibe into more our style. Before that it was a stark patio with no seating and little to no landscaping. We used 10 foot poles to keep them the same height as our 1st floor roof line!

You will need 2-3 people to help, definitely is {at least} a 2 people project to be safe. Do NOT attempt alone unless you are an engineering + construction expert.

DIY String Lights Post Panters Outdoor

Supplies:

Outdoor String Lights
   - 3 -4 Strands 
Wood Wine Barrels | Whiskey Bourbon Barrel or {other} Planter Base
   - Resin Barrels
Wood Posts- 10ft 4x4 
Cement Concrete- quick set 
  - (3) Bags per planter
Corner Brackets/fasteners (for posts)
  - per wood post
Deck Screws
Hooks/fasteners (for string lights)
Pavers 24 x 24inch
Potting Soil Mix
Flowers
Plants
Cordless Drill
Electrical Tape
Level
Ladder

Optional:

Bottle Opens, bottle cap collection
Post Caps
Paint

Step 1:

Level and place on a paver, concrete patio, or the area you've prepped for this space. We didn't want to use the space on the existing cement patio concrete slab to accommodate the area needed for each wine barrel planter. On the outer border of patio we added a huge concrete paver under each on after leveling the ground underneath. It made a big difference in the usable living space available...

Step 2:

Move the barrel and make sure it is where you intend on leaving it. It will be very difficult to move and maneuver after the next few steps. Move it now so there are no regrets later. 

My whiskey wine barrels were already really, really, difficult to move while empty. Even buying them was a feat; rolling to register, loading them, and bringing to the backyard. I had to have another person help me carry them and I could hardly imagine moving them while they had a wooden post attached, cement, and potting soil in them.

Step 3:

Optional- Secure the hooks/ fastener now which will hold the lights up to avoid using a ladder later. This step can be done later but you'll need a ladder, yet you may need it later to install the string lights anyway. But instead of both the drill, screws, hooks hardware and later string lights you can take care of this step now while it's still on the ground.

Step 4:

SAFETY FIRST- For this step complete each WOOD barrel, one at a time! This method is for heavy duty wood barrels, not resin. {Resin will need a wooden support under each barrel to attach screws and posts to barrel.} 

Attach the wood posts to the bottom of each planter wine barrels with sturdy corner brackets using the drill. DO NOT move on to next planter until you are done with {next step} the cement in each.

We did brackets, then cement, and dry. Then made the next planter. If you are DIY-ing 'doing it yourself' do not move on until the planter is safe to stand alone. We chose a thick wood post for our planters to withstand the wind {hurricane season} and so it wouldn't snap at the heavy base. These {so far} don't even move when there high winds.

Step 5:

SAFETY FIRST- Pour and mix concrete to set, 1 barrel planter at a time. Tie to stabilize it while drying. DO NOT move on until each barrel it 'safe.'

Step 6:

After cement is dry, drill hole about the concrete line to allow for drainage for the plants. 

Step 7:

Planters are ready for 'potting' soil and plants. In each planter I opted for my most FAVORITE perennial plant in the world- 'Delosperma Cooperi.' It is a famous and very popular purple ice plant succulent that is commonly seen off the coast of my home state of California. I plant it at any home I live in and it is stunningly gorgeous, easy to care for and it spreads as beautiful ground cover or plant. It will eventually spill over each barrel like a vibrant waterfall.

DONE.

Side Notes: We made 3 barrel DIY planters yet we could've gotten away with only making two.  You can only make 1 and do a 'v' shape light string situation. So price may vary depending on your needs. My supplies are from Home Depot if you want the exact materials. The whiskey barrels online are about $64-70 each, when I purchased 'in-person' they were $45 each + pro discounts. Most of the materials can be easily found online, order ahead + pick up curbside/ shipped directly to your door. 

The entire project for me was about $170-200 dollars which is way less expensive and less permanent than a pergola etc. to achieve the same look without taking away my natural light into the home. The trees on our property are also new so we couldn't hang from mature trees either. This was the perfect solution!

SO Delighted.

Now you're ready for sparkling light nights and cozy backyard living dreams! I hope you enjoyed this project, please let me know down in the comments that you've visited, what you think, if you try this project out, and if you have any questions. Have a wonderful DIY Spring and Summer!!

My helper next to me for the night time photos :)!

Sources:

Fire Pit - Home Depot
-Fire Pit cover - Hampton Bay Home Depot
Landscape Lights 
Beach Adirondack Chairs - Costco $79 each
Beach Adirondack Tables- $20 set of two
Patio Furniture Set - Better Homes and Garden  $1000
Accent Pillows - Target, Better Homes and Garden Walmart $9
Planters/ Pots - Target
Nesting Tables - Walmart
Outdoor String Lights  Target $16
Wine Barrels | or {other} Planter Base - Home Depot $49
Wood Posts 10ft 4x4 - Home Depot
Post Caps - Home Depot
Concrete Mix - Home Depot
Corner Brackets- Home Depot
Deck Screws
Hooks - Home Depot $7 set of three, came with screws
Pavers- Home Depot $3
Potting Soil Mix- Miracle Grow {already had}
Flowers {already had} Home Depot
Plants {already had} Etsy, Walmart
Cordless Drill (already had) Lowe's
Trampoline Sam's Club
Playhouse Cedar- $352
Chicken Coop Large (modified)- $699
Kids Chaise Lounger - $130
Kids Picnic Table Bench Set- $195
Aqua Blue Tassel Umbrella- Better Homes and Gardens $45
Umbrella Base- Costco $45
Ibiza Black and White Stripe Rug- Better Homes and Gardens $49.88

~Be Sweet
Christina
Sweetest Haute 


SUBSCRIBE | and follow @SWEET HAUTE 
Instagram | Pinterest | YouTube | Facebook {new page}, Twitter.


Monday

How to Organize a Mudroom

How to Organize your Mudroom / Drop Zone!

We all have one in our homes, big or small...we have an area of the house where we collect our jackets, keys, bags, shoes, umbrellas and it is usually next to an entrance. For that reason it is extremely important to keep that area clean and organized for safety and sanity reasons: How to Organize a Mudroom. No one wants to trip over bags and shoes coming in and out of the home, and nobody wants to see a mess of chaos first thing when they walk into their home every night.

We want to have a gorgeous view of serenity when we walk in after a long day and if your Mudroom / Drop Zone is the first thing you lay your eye on when you come home I'm going to share some DIY tips and ideas with you so you can keep your Mudroom Organized.

We have a Mudroom next to our back entrance and as you can imagine, it accumulates many jackets, bags, books, and boots...it can get crowded if we do not regularly keep it orderly and tidy up in there.
The key is to 'Live with Less' stuff!

In the image below you can see a few peaks at our Mudroom; it has a key organizing shelf, built-in desk, and hooks over bench seating...

http://sweethaute.blogspot.com/2015/04/how-to-organize-mudroom.html
 Found this baby at Target:) Key Organizing Station


 http://sweethaute.blogspot.com/2015/04/how-to-organize-mudroom.html
You'll always have an idea where you left your keys and glasses!
 
http://sweethaute.blogspot.com/2015/04/how-to-organize-mudroom.html
 Home Organization 31 Day Detox Diet Series
Label  |  De-Clutter  |  Live with Less Stuff:)

Manage and Maintain your Mudroom:

1. Empty it out completely.

2. Clean it.

3. Maintenance
-cosmetic touch ups

4. Add storage/ hooks as needed.
-prevents tripping on things on floor / walk ways
-wall organizer
-shelving get items off floor space

5. Label
-label designated areas for the particular item it houses
-replace items in that area every time, encourage children to get into that habit
-promotes healthy routine

6. Trash Receptical
-if your space is big enough, include a trash container so things aren't being left instead of tossed

7. Necessary items only 'Zone'
-only keep necessary 'mudroom' items in this space
-1 seasonal jacket / shoes per person
-1 bag/ backpack per student
-store the rest, toss, or donate. 
NO OTHER ITEMS SHOULD BE IN THIS SPACE:)

8. Include Maintaining your Mudroom / Drop Zone in weekly cleaning routine.
-keep a 'To Do' check list on hand
-clean / sweep weekly
-return non-designated room items to correct room of house.
-throw out trash

DIY Built in Wood Trim Homework Desk TutorialDIY Wood Trim Board Batten Built in Homework Desk Tutorial

http://sweethaute.blogspot.com/2015/04/how-to-organize-mudroom.html


http://sweethaute.blogspot.com/2015/04/how-to-organize-mudroom.html
Remember: 3 Steps
Remove  |  Sort  |  Live with Less
Home Organization 31 Day Detox Diet Series


Ok. You are ready to conquer your Mudroom / Drop Zone!
Please leave a comment below and thank you for visiting...

HAVE A WONDERFUL DAY full of organizing:)

~Be Sweet
Christina
Sweetest Haute 


SUBSCRIBE | and follow @SWEET HAUTE 
Pinterest | YouTube | Facebook {new page}, Twitter, | Instagram.

http://sweethaute.blogspot.com/2015/04/how-to-organize-mudroom.html

Tuesday

Berry Blue Cotton Candy Sugar Scrub

Berry Blue Cotton Candy Sugar Scrub

How to make Berry Blue Cotton Candy Scrub!
You can create so many scrumptiously scented Sugar Scrub DIY style right in your home kitchen. DIY Beauty and Skin Care Treatments are easy to make and are more affordable that purchasing, especially when you just want to 'try out' a new scent. I personally love the scent of Cotton Candy so I thought I'd try out a new sugar scrub cleanser recipe and then share the tutorial!
I realize this recipe isn't green or all natural, yet it is still a fun DIY beauty recipe to try out during Spring Break....throw it in the travel bag:)

http://sweethaute.blogspot.com/2015/04/berry-blue-cotton-candy-sugar-scrub.html

http://sweethaute.blogspot.com/2015/04/berry-blue-cotton-candy-sugar-scrub.html
Summer is calling....cotton candy here!

http://sweethaute.blogspot.com/2015/04/berry-blue-cotton-candy-sugar-scrub.html

Supplies:

1 Cup Sugar
or Vanilla Extract
1/2 cup Carrier Oil
    -Coconut, Almond Oil, Olive, Apricot, Grapeseed, Safflower, Avocado etc.
Storage Container
   -Glass, I used a Mason Jar
Large Bowl


Mix 1 Cup, 4 drops Essential Oils scent/extract, 1/3-1/2 Oil. The larger container, amount you need increases and double up recipe to fit your project size and container(s) you're using.


Step 1:

Mix 1 Cup Sugar and 1/2 cup Oil, play with ratios until you get the consistency you want. I prefer not to have excess oil.

Step 2:

Add the packet of Cotton Candy frosting mix-in and combine. This adds color and scent.

Step 3:

Store inside of a GLASS container, do not use plastic. Mason jars are excellent for this purpose. Decorate with Washi Tape and a gift tag if giving to someone:)


http://sweethaute.blogspot.com/2015/04/berry-blue-cotton-candy-sugar-scrub.html


http://sweethaute.blogspot.com/2015/04/berry-blue-cotton-candy-sugar-scrub.html


You may also be interested in:


http://sweethaute.blogspot.com/2015/04/berry-blue-cotton-candy-sugar-scrub.html
If you try this recipe out, please share with me on the SWEET HAUTE Facebook Page! 
Enjoy and thank you for visiting!!
Have a wonderful day:)


~Be Sweet
Christina
Sweetest Haute 

SUBSCRIBE | and follow @SWEET HAUTE 
Pinterest | YouTube | Facebook {new page}, Twitter, | Instagram.

http://sweethaute.blogspot.com/2015/04/berry-blue-cotton-candy-sugar-scrub.html


Pin It button on image hover