
Christmas is in the air {a top favorite holiday}...the Christmas decorations in the store went up immediately after Halloween and we haven't even had Thanksgiving Dinner yet! Today I am sharing a wonderful, budget friendly DIY project that you can complete and you can display it right on the day after Thanksgiving {of course}...that's when the tree would go up in my house when I was growing up. This is my thrifty DIY approach to those beautiful, although sometimes expensive, Christmas Ornament Topiaries. You can use it indoors by the fireplace or tree....or outside to give the final touch to your amazing Christmas porch decor.
If you cannot make them this year, pin it on Pinterest....hit up the clearance Christmas Sales {like we did} and make them for next year ;) Source list at end of this post.


Easy Tutorial, Budget Friendly, Cheap + Affordable.

Supplies:
- Baskets
Wooden Dowel at least 1/2inch thick
Glass pebbles/marbles vase filler {base weight}
- various sizes
-12 inch giant ornament
-10 inch outdoor ornament
-8 inch ornament
-sequin
-glittery
Glue Sticks
Newspaper
Scissors
Hole 'starter'
-{i used a clean meat thermometer...hahaha}
Drill Bit

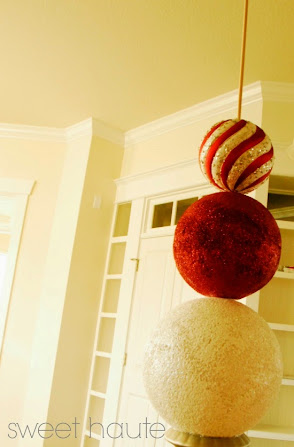
Here are some closer images so you can enjoy the glitz and glitter!
I don't know if you can see it clearly, but the bottom ornament is painted white with iridescent white opal glitter, it didn't communicate well through the photo...maybe try silver or stripes again for yours.
Gorgeous.....!
Gorgeous.....!
Step 1:
Selection of the shapes, scale, and sizes you want your specific topiary to be. Spray pain urn pot if you need to, and you cannot find the color you want. After you've selected a base that is sturdy, definitely will not tip over, and if your decor is weather proof {if needed.} I chose a ceramic base that can be used indoor or outdoor. Prepare your 'base' you are using by placing glass vase filler to weigh it down and stabilize your wooden dowel ad your vase/pot styrofoam insert into base. This step can also be done after you've let your styrofoam floral balls dry if you are using those in topiary.

Here I am planning what design pattern I want before painting and gluing.
Step 2:
If you do not have styrofoam floral balls move on to next step. Take wooden dowels and poke it through your styrofoam balls before painting. I did this to speed process up and it could be drying as I moved on to next ornament steps. This way you are handling all the 'balls' without the glitter and paint on them and will save you time/mess touching them up later as well. Lay out some newspaper and paint the Styrofoam balls {if you have any} one side at a time, sprinkle glitter on the wet paint and let dry, paint the next part once paint it dry. Set aside. If you do not have styrofoam floral balls move on to next step.


For my ornament pattern I needed to paint to Styrofoam balls, I couldn't find ornaments large enough so I had to DIY them!

The red paint and glitter looked like this after drying... :)
Step 3:
Take off the top 'hook loops' of each shatter proof ornament and either melt a hole open with your hot glue gun with plastic ornaments/ or drill a hole for the wooden dowel to go through directly across from the other opening.


Here {above right} is the mini ornaments I found, my glitter, and the paint I used...


Remove hook loop attachment and either 'melt' an opening with your hot glue gun big enough or drill hole opposite of each opening.

 DIY Christmas Ornament Topiary


Step 4:
Stack by size ornaments by inserting wooden dowel / guide ornaments through the drilled/melted open holes you made.
Step 5:
Add something like Glass pebbles/marbles to container to weigh it down so it will not tip over. Use the Styrofoam pot Insert in urn/base to connect and install wooden dowel.
Step 6:
Glue your largest ornament to the base of the urn/ container with hot glue or E600 glue. Make sure it's level and straight. Then I installed my ornaments 'upside down' to add extra stabilization to them. The ornaments will then be connected to each other all the way to the top and will withstand wind/cold if any glue comes loose later on.
Step 7:
Add glue in between each ornament connection so they are secure. Attach
the mini ornaments to cover the connections or leave open if it looks
presentable.


The sequin iridescent ornaments are my favorite!
I don't know why the white ornament's iridescent glitter and paint aren't translating to the images. In person you can really see:( ...tear.
I don't know why the white ornament's iridescent glitter and paint aren't translating to the images. In person you can really see:( ...tear.
I ended up not adding tiny ornaments to the last 2 top rows because it didn't look right and since the connections between the ornaments were seamless enough I just left it open. I really love how it came out, and once I curated all my materials it actually came together really quickly!
Someone else really likes it too...you can see the scale of this ornament topiary next to my youngest daughter. The fireplace mantle is about 5.5ft so these decorations would look great flanking the front door, a porch, or a beautiful fireplace in your home!
Enjoy, please leave a comment to let me know you visited!
If you have questions, comment below. Inbox or tag me if you've made one and would like to share it!
Sources:
Urn Topiary Stand- Hobby Lobby (painted it silver with Krylon Spray Paint)
12 inch Styrofoam Ball- Michaels
10 inch Styrofoam Ball- Michaels
Wooden Dowel- Lowe's/ Michaels
Ornament Set- Walmart
Large ornaments- Target
Mini Ornaments (vase filler)- Michaels
Paint- Michaels
Glitter- Michaels
Hint: use coupons and clearance end-of-season sales at all of the above locations!
Hint: paint items to match color palette instead of searching endlessly:)
Hint: paint items to match color palette instead of searching endlessly:)
You might also be interested in:


Outdoor Christmas Wreaths- DIY Tutorial
Enjoy, and please leave me a comment below to let me know you've visited!!
Enjoy, and please leave me a comment below to let me know you've visited!!
~Be Sweet
Christina
Sweetest Haute
Subscribe to the blog, and follow along @sweethaute on YouTube, Pinterest, and Instagram!!
This is so lovely, what a fab idea. It did make me smile when you say "drill a hole in the ornament" Is that as easy as it sounds?
ReplyDeleteThere is no way I have time to make this for this year but I'm thinking I could pick up suitable ornaments in the sales in January and maybe have a go for next year - I love the size and scale of it.
thanks, that what I did;)
DeleteDrill a hole...yes I guess it's easy if you use a drill as often as we do around here...LOL
Just gorgeous! -- I'm featuring you today at Show Me Saturday. Hope to see you there!
ReplyDeletethank you Ginger! Appreciate it ;)
DeleteHello gorgeous! Everything looks so amazing! Pinned and tweeted. I hope to see on Monday at 7 pm. We love to party with you! Happy Monday~Lou Lou Girls
ReplyDeletethank you kim!! Thanks for the invite ;)
DeleteLove it, I want one...no make it two. Thanks for linking up at Project Pin it! It's been been to the Project Pin-it board on Pinterest.
ReplyDeletexoxo
Denyse
Thank you Denyse! Appreciate it
DeleteWhat a cute & clever idea! Will be featuring it next week. Thanks for linking to Craftastic Monday at Sew Can Do!
ReplyDeleteThank you Cheryl....and for stopping by:)
DeleteI adore this idea!!! So creative!
ReplyDeleteCarolyn
http://www.ccmcafeeperspective.com
Awwwwe thanks Carolyn!!!
DeleteLove this idea....very simple and elegant!
ReplyDeletethank you Gilly, and for visiting!
Delete