
DIY Maternity Hospital Gown- FREE Pattern
Every mom-to-be deserves to look amazingly wonderful, especially on their big day after all the work they've put in! If you still want to feel and look on point on your delivery day here is a simple and cute way to make a DIY Hospital Maternity Gown out of an inexpensive bed sheet/fabric! I modified this pattern I found...it is great, FAST, and easy to follow free pattern over here at Lazy Girl Designs. Then I made a few important adjustments to my liking to create a wonderful custom designed maternity gown for the 'delivery' day! Yay! I customized it so that you can nurse on both sides, making initial breast feeding a breeze!
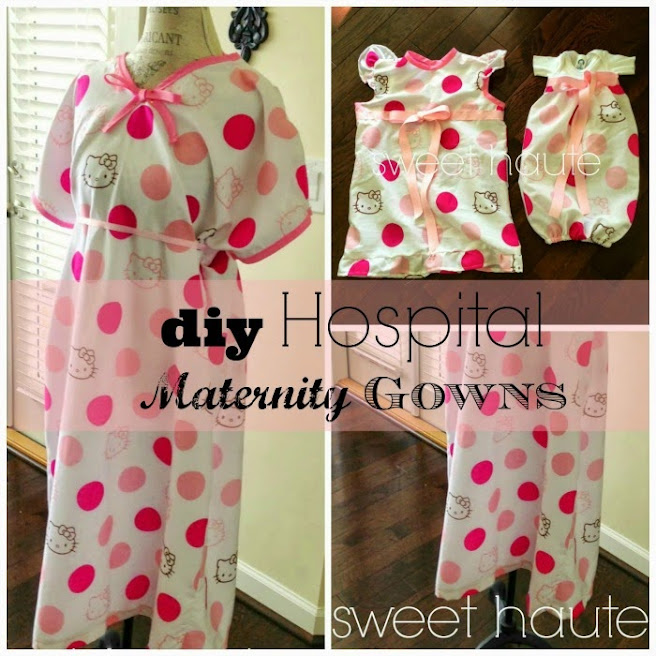
How to make a DIY Hospital Maternity Gown:
Supplies:
3. Ribbon (small for back ties, large for child gown detailing)
5. Bias Tape
6. Thread
7. Iron
8. Velcro
I already had a twin sheet set that I bought from Target for my
daughter's room when I was still pregnant. Subsequently her crib was
're-called' and the manufacturer gave a new FREE replacement crib
voucher. We then bought a crib that could turn into a Full size bed so
we couldn't use the nostalgic hello kitty sheet set. So when I found out
we were having another baby girl and was wanting to make a hospital
gown, I remembered the sheet set and re-purposed them into..... 3 hospital gowns
(me, big sis, & newborn) AND 2 pillow cases were given to big sister
(woohoo!). Big sister can re-use her gown as a night gown in the future. That's a
fantastic deal for one sheet set that was sitting in the linen closet
unopened for years and years. I bought that set about 5+ years ago.

Step 1:
MATERNITY SIZE: Make 2 right sides to turn the pattern into a maternity size AND
I added 6-8 inches to the length so that it would fit over the baby bump comfortably. I added six inches and it was plenty long and so measure yourself for size before cutting. EACH person it will fit differently so depending on how tall you are, add about 6 inches.

Step 2:
{Optional} Add lining. I inserted a fabric lining because the sheets were a little bit see through. For the adult maternity gown and the big sister gown I added pink bias tape details and ribbons.

Here you can see how to make the 'V-neck' edging and then add the simple bow.
Step 3:
Create bow and add you bias tape to edges.
Bow Instructions:
Step a.
Make a long bias tape 'ribbon.'
-I measured mine by tying the bow with raw bias tape and then cutting the length I needed.
Step b.
Sew the bias tape long edge, then fold each end and sew down into place to prevent fraying.
Step c.
Assemble the bow shape by make 2 loops, then pin down...stitch into place.
Step d.
Make a separate 1-2 inch center loop shape for center and sew down.
-Go over the center piece again and stitch into square design for extra enforcement.
Voila, simple bow detail....
Step 4:
Stitch maternity gown together, follow pattern instructions.
Big Sister-
The big sister gown can be made by tracing an outline of an existing nightgown she has. Add bias tape and ribbon detail, we also used Velcro fasteners for this gown as well since it was not a stretch fabric material.
Newborn Gown-
The newborn gown was made with a fabric 'tube' shape ELASTIC gathering around waste + attached to a onesie, then elastic to gather bottom. Add bias tape and ribbon detail to finish look.

Oh, and my mother helped me with the newborn gown details and big sis gown details because I was out of energy when she arrived, just in the nick of time because I was 6 days overdue. I had everything ready (Newborn size Onesie, remnant fabric, elastic, and pink ribbon), but just couldn't get motivated because I didn't want to accidentally mess it up. She didn't mind because she was just chilling out with not much to do, waiting for baby to arrive! (She's also excellent at crochet, and sewing anyways.)

Please see the supply list {above}. You will need ribbon, Velcro {or something similar: snaps, buttons}, fusible interfacing. I did NOT use buttons, I added ties instead that I made with the pink bias tape and added the bow detail on the front neckline.

I know, it's not perfect but it is indeed made with love!
Again...You will need:
3. Ribbon (small for back ties, large for child gown detailing)
5. Bias Tape
6. Thread
7. Iron
8. Velcro
Pin it!
You may also like:


~Be Sweet
Christina
Sweetest Haute
Please Subscribe to blog, Follow on Instagram, Pinterest, and YouTube!

