
DIY Refrigerator Shelf Liners
How to make your own DIY Refrigerator Shelf Liners. I love attention to detail! Organizing, unique decor, and the little details in my house are what 'make' my home....well, 'home sweet home.' I wanted to share something that I made for the refrigerator...or as my daughter would say 'frigafrader' {so cute}...this craft can be done quickly and inexpensively, two things that I look for when doing anything DIY for the home to create a nice result.
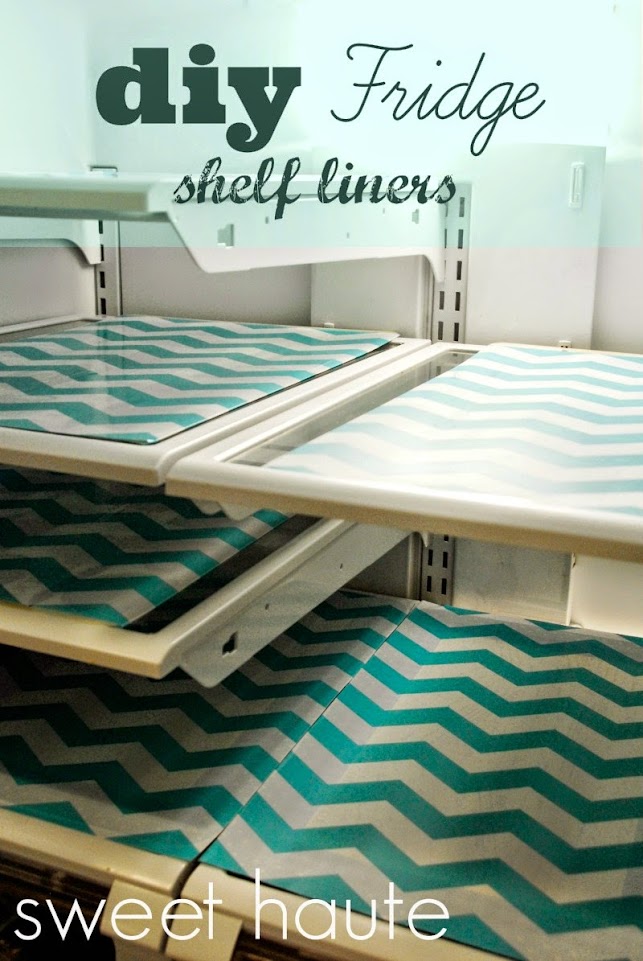
This is a tutorial about how to make your own DIY Fridge Liners, for the glass shelves in your refrigerator!
Fridge Liners, Mats, or Coasters which are basically 'liners' made for your fridge shelves. These keep your glass shelves clean and instead of pulling out entire heavy glass shelf, you merely just take out the liner and wipe clean...and voila, fast and done!
Supplies:
Credit Card
Cardboard
Scrap Paper
Pencil
I made them out of inexpensive place mats and adorable turquoise chevron self adhesive shelf liner that I got here. I ended up finding the place mats at Walmart on clearance but at regular price they are around $1 in my area, I'm not sure if they have any at the dollar store but go ahead check that out too.
If you can find place mats that are already rad, then you don't need to put the extra effort in to transforming them with contact paper...just measure and cut to fit the shelf! I couldn't find any that were already fabulous so I had to change the design and I am thrilled with the results! Yay!
If you can find place mats that are already rad, then you don't need to put the extra effort in to transforming them with contact paper...just measure and cut to fit the shelf! I couldn't find any that were already fabulous so I had to change the design and I am thrilled with the results! Yay!
Step 1:
Roll out your contact paper to measure the amount needed for each place mat.
Step 2:
Carefully peel back the wax layer away from adhesive and and place the longest edge of place mat gently without making bubbles in contact paper.
Step 3:
Use a credit card /plastic card to smooth the self adhesive shelf liner paper to each place mat to ensure that it adhered onto the mat smoothly and with no air bubbles or creases. Slow and steady as to not create bubbles.

Step 4:
For the refrigerator doors I simply traced the shelf with paper and then made a cardboard template 'guide' to cut the place mats into the correct shapes, then covered them with the chevron shelf liner paper!
It looks so cute every time I open the fridge for something....it makes me happy! ;)
I did six of these refrigerator door shelf liners, three on each side for a french door styled refrigerator.
It came out really so nice. The bottom shelf I use for the kids to reach their water bottles and kid friendly snacks.


I hope you find this tutorial helpful, please enjoy! Let me know if you do a similar project! What do you think? If you have any questions let me know.
Please comment below, subscribe, and check out my other posts!
Thank you for visiting....
Have a wonderful day:)
Please comment below, subscribe, and check out my other posts!
Thank you for visiting....
Have a wonderful day:)

Oh I love this idea!! It makes a boring fridge look ADORABLE! Thanks for sharing and thanks for linking up to Thrifty Thursday!
ReplyDeleteThank you and me and my family are really enjoying this happy addition to the fridge!
DeleteChristina at
SWEET HAUTE
What a creative way to make something that's usually boring so pretty! It would be so fun to see that every time I open my fridge!
ReplyDeleteExactly....it is SO cute and pretty now!! Thanks for visiting.
DeleteChristina at
SWEET HAUTE
That's a great idea! But please tell me that you staged your fridge for this picture...it is way more organized (and way more healthy) than I think my refrigerator has ever been! :)
ReplyDeleteHAHAHAHhahahah the answer is 'yes' and 'no'....yes it was a little bit staged because I was loading everything back in and just took pictures before placing EVERYTHING back so you could really 'see' the liners well. Yet no....because I usually keep it semi-organized so I can see what I have on hand and we do eat those items regularly because we are into fitness/weight lifting. Eventually I would like to eat only fresh/raw but it's a big task to take on. Thanks for visiting!
DeleteChristina at
SWEET HAUTE
Great idea. We definitely need these in our fridge. I will have to try to make these myself. I would love it if you would share this over at my link party that is going on right now.
ReplyDeletehttp://www.ifitsnotbaroquedesignblog.blogspot.com/
Thank you, I appreciate it! No problem I would love to share it...;)
ReplyDeleteChristina at
SWEET HAUTE
Very cute!
ReplyDeleteThanks, we love it
DeleteI would have never thought of this and the glass shelves on mine drive me crazy!
ReplyDeleteIt's VERY helpful for cleaning.
Deletenice! i could totally use these and i love the diy alternative
ReplyDeleteso cool
DeleteThis is such a great idea! I had been looking at buying a expensive set of fridge coasters but couldn't really justify the price. I will definitely be looking for some cheap place mates now! I'm inspired. Thanks! :)
ReplyDeleteYou're welcome, I love to share and create
DeleteThis is fantastic! I've been seeing a few of these fridge liners floating around and NEEEED to do something with mine. I actually have two rolls of that exact contact paper right now. I smell a craft! :)
ReplyDeleteThanks for linking up with Tell Us Tuesday!
The contact paper is so cute!
DeleteSeriously love this idea! It makes cleaning the refrigerator so easy and adds major cuteness to the shelves! Thanks! Pinning :)
ReplyDelete*Visiting from Transformation Thursdays at The Shabby Creek Cottage*
Such a wonderful idea! Thanks you so much for sharing at this week's Project Inspire{d} ~ pinning.
ReplyDeleteI hope to see you again at next week's party.
Hugs,
Mary Beth
I need to do this. It's amazing how much it adds! I'd love if you'd link up to The DIY'ers: http://homecomingmn.blogspot.com/2013/08/the-diyers-and-our-country-weekend.html
ReplyDeleteThank you for your comment!
DeleteThanks for linking up to Gingerly Made's Show & Tell. You've been featured!
ReplyDeletehttp://www.gingerlymade.com/2013/08/show-tell-features_20.html
AWESOME thank you for your encouragement and support;)
DeleteThis is so cute! How fun would it be to see blue chevron every time you open the fridge!! I would be thrilled if you have the chance to share this at our new Fall DIY Challenge if you haven't already- today we are linking up BLUE projects - old or new! Hop over to The Happy Housie to share yours! Hope to see ya there!
ReplyDelete- Krista
Christina! These are adorable! I've been looking for a way to DIY this forever. Super duper cute! Thanks so much for stopping by Absolutely Arkansas today, looking forward to the Thursday link-up!
ReplyDeleteXo Kylie
Thank you!
DeleteWhat a brilliant idea! I hate cleaning the fridge, your mats look so much easier and cleaner. Awesome! Thank you so much for linking up to our Get Your DIY On Challenge this week. Next week is Fall Themed Wreaths, I hope you'll make it back and share with us! Have a great week!
ReplyDeleteMandy @ The Hankful House Blog
Thank you Mandy for visiting!
DeleteThis is too cute! I'm totally about to pin it. I'd love it if you'd link this up to my blog hop party, DIY Weekend:
ReplyDeletehttp://mrandmrswinslett.blogspot.com/2013/09/diy-weekend-919.html
Thank you!
Miranda @ Mr. and Mrs. Winslett
thank you Miranda for visiting!
DeleteGreat idea. So simple and clever.
ReplyDeleteThanks for visiting, thanks
DeleteGenius!
ReplyDeleteThanks, we love them
DeleteI love this idea! What kind of placemats did you use? Fabric? Plastic?
ReplyDeleteI used plastic ones from walmart.
Deleteplastic from Walmart
DeleteThis comment has been removed by the author.
ReplyDeletethank you Kathleen for visiting.
DeletePlease tell me where exactly you used the place mats. I just don't see how they fit on the square shelves.
ReplyDeleteHi, I cut the placemats to fit the shape of the glass portion only, most of the mats are still a rectangle shape. For the more coverage just buy more mats I only bought about 8 mats. Then used cardboard for the door shelves.
DeleteIdk if my questions are going to you bc they aren't showing on the blog, so i'm going to try this way one last time. I'm wanting to do this but am confused on if you have to use the contact/adhesive paper if you use the placemats? Thank you for your help, I hope this goes through...
DeleteIt looks like she cut the place mats to size and then covered them with contact paper she liked better than the placemats.
DeleteCorrect I covered the plastic placemats with designer contact paper.
DeleteThis is so freaking adorable....we just remodel our kitchen with new appliance and this would such a sweet and surprise for the people who still likes to raid my frig....thank you so much for sharing this brilliant idea....
ReplyDeleteLOL that would be awesome, thank you for visiting!
DeleteFantastic! I love this idea. I would love it if you joined and contribute your awesome posts at my link party at City of Creative Dreams on Fridays :D Hope to see you there at City of Creative Dreams Link Party
ReplyDeleteThank you for visiting Shanice.
DeleteBRILLIANT idea and so fun! Thanks SO MUCH for sharing it at Project Inspire{d}! xo
ReplyDeletethank you for visiting Malia...
DeleteI love this! I'm so going to do this the first chance I get. I love the liners you can purchase but this is so much less expensive! Thank you for the great idea
ReplyDeletethank you for visiting, thanks
DeleteThank you for this wonderful idea! But i'm confused about the contact/adhesive paper. Do you use it on the placemats or is that only if you can't find the design you are looking for? Thank you for your help, can't wait to try this!
ReplyDeleteyes, I just found red and brown placemats....then I covered with the aqua chevron etc. Cut them for the sizes I needed.
DeleteI love this! You are so creative. This looks awesome! Thanks for sharing!
ReplyDeleteThank you everyone! This blog post idea of fridge placemats/contact paper were easier for us to clean because they are light weight and our kids can help too, wipe these instead of them lifting the heavy glass. Then do a major glass clean every so often!
Delete